Deploying a Servlet: Making Your Web Application Live
Hello everyone! After developing a Servlet, the next crucial step is making it accessible through a web server. This process, known as Deploying a Servlet, involves configuring your Servlet within a web application structure and placing it in a Servlet container so that it can receive and process client requests. Understanding proper Servlet deployment is fundamental for any Java web developer aiming to bring their dynamic web applications to life.
What Does Deploying a Servlet Mean?
Deploying a Servlet refers to the process of packaging your Servlet classes along with other necessary resources (like HTML files, JSP pages, image files, and configuration files) into a web application archive (WAR file) and then installing this WAR file into a Servlet container. A Servlet container, such as Apache Tomcat, is responsible for managing the Servlet’s lifecycle and handling incoming HTTP requests. Effectively, deployment is how you tell the web server where your Servlet is and how to run it.
This process ensures that when a client’s web browser sends a request to a specific URL, the Servlet container knows which Servlet to invoke. Consequently, the Servlet can then execute its logic and return the appropriate dynamic content to the client.
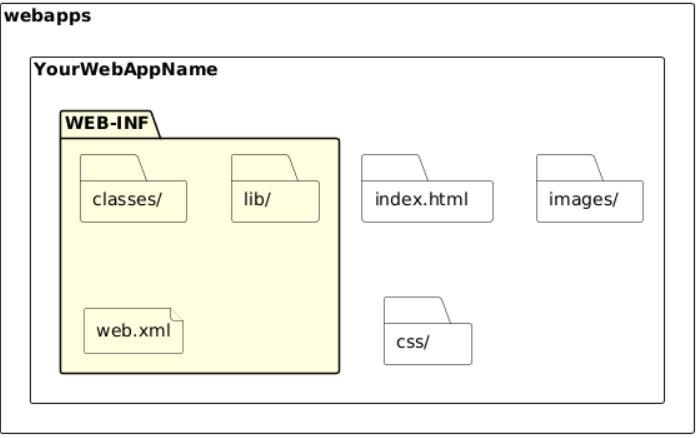
Essential Web Application Directory Structure
For successful Servlet deployment, adhering to a standard web application directory structure is paramount. This structure, defined by the Servlet specification, helps the Servlet container locate and manage all components of your web application:
webapps(Root of the Server’s Web Applications): This is the directory where you place your web application folders. For example, in Apache Tomcat, this is typicallyTOMCAT_HOME/webapps/.YourWebAppName(Your Application Root): Insidewebapps, you create a folder for your specific web application (e.g.,mywebapp). All your application’s files reside here.- Static Content: HTML, CSS, JavaScript, and image files are placed directly under
YourWebAppNameor in subfolders (e.g.,mywebapp/images/). WEB-INF(Mandatory Directory): This is a special directory located directly underYourWebAppName. Files withinWEB-INFare not directly accessible by clients via URL, ensuring security. This folder contains crucial deployment files.WEB-INF/classes(Mandatory Directory): This directory is where all your compiled Java Servlet classes (.classfiles) and other helper classes must be placed. The Servlet container automatically searches this directory for classes.WEB-INF/lib(Mandatory Directory): This directory holds all JAR (Java Archive) files that your web application depends on (e.g., JDBC drivers, external libraries). The Servlet container automatically adds these JARs to the application’s classpath.WEB-INF/web.xml(Deployment Descriptor): This is the most critical configuration file for Servlet deployment. It defines how requests are mapped to Servlets, Servlet initialization parameters, security constraints, and other web application settings.
- Static Content: HTML, CSS, JavaScript, and image files are placed directly under
Configuring Servlet Deployment with web.xml
The web.xml file, also known as the Deployment Descriptor, is an XML file that provides configuration information for your web application to the Servlet container. It tells the container which Servlets to load, how to map URLs to specific Servlets, and defines various other runtime settings.
Here are the key elements used in web.xml for Servlet deployment:
<servlet>Tag: This element defines a Servlet and assigns it a logical name.<servlet-name>: A unique name for your Servlet within the application.<servlet-class>: The fully qualified class name of your Servlet (e.g.,com.example.MyServlet).<init-param>(Optional): Allows you to define initialization parameters specific to this Servlet.
<servlet> <servlet-name>MyServlet</servlet-name> <servlet-class>com.example.MyServlet</servlet-class> <init-param> <param-name>greeting</param-name> <param-value>Hello from Servlet!</param-value> </init-param> </servlet> 2. **`<servlet-mapping>` Tag:** This element maps a URL pattern to a defined Servlet, allowing the container to direct incoming requests to the correct Servlet. * `<servlet-name>`: Must match a `<servlet-name>` defined in a `<servlet>` element. * `<url-pattern>`: The URL pattern that, when matched, will invoke this Servlet (e.g., `/myservlet`, `/data/*`).xml <servlet-mapping> <servlet-name>MyServlet</servlet-name> <url-pattern>/hello</url-pattern> </servlet-mapping> “` In this example, any request to http://localhost:8080/YourWebAppName/hello would be handled by MyServlet.
Example web.xml structure for Servlet deployment:
<?xml version="1.0" encoding="UTF-8"?>
<web-app xmlns="http://xmlns.jcp.org/xml/ns/javaee"
         xmlns:xsi="http://www.w3.org/2001/XMLSchema-instance"
         xsi:schemaLocation="http://xmlns.jcp.org/xml/ns/javaee
         http://xmlns.jcp.org/xml/ns/javaee/web-app_4_0.xsd"
         version="4.0">

    <servlet>
        <servlet-name>HelloServlet</servlet-name>
        <servlet-class>com.example.HelloServlet</servlet-class>
    </servlet>

    <servlet-mapping>
        <servlet-name>HelloServlet</servlet-name>
        <url-pattern>/greet</url-pattern>
    </servlet-mapping>

    </web-app>
Steps for Deploying a Servlet
Follow these general steps to successfully deploy your Servlet-based web application:
- Write and Compile Your Servlet: Create your Java Servlet class(es) (e.g.,
HelloServlet.java) and compile them into.classfiles usingjavac. - Create Directory Structure: Set up the standard web application directory structure (e.g.,
YourWebAppName/WEB-INF/classes/). - Place Compiled Classes: Put your compiled Servlet
.classfiles into theWEB-INF/classes/directory. - Create
web.xml: Create theweb.xmlfile inside theWEB-INF/directory and configure your Servlet and its URL mapping as shown above. - Add JAR Files (if any): If your Servlet depends on any external JAR libraries (e.g., a JDBC driver), place them in the
WEB-INF/lib/directory. - Package into WAR (Optional but Recommended): For easier deployment, especially in production environments, you can package your entire
YourWebAppNamedirectory into a Web Application Archive (WAR) file (e.g.,mywebapp.war). You can do this using thejarcommand:jar -cvf mywebapp.war .(run from insideYourWebAppNamedirectory). - Deploy to Servlet Container:
- Manual Deployment: Copy your
YourWebAppNamefolder directly into thewebappsdirectory of your Servlet container (e.g., Tomcat). If you created a WAR file, simply copy the.warfile into thewebappsdirectory; the container will automatically unpack it. - Manager Application (for Tomcat): Use the Tomcat Manager web application to upload and deploy your WAR file.
- Manual Deployment: Copy your
- Start/Restart Server: Ensure your Servlet container (e.g., Tomcat) is running. If it was already running, you might need to restart it or reload the application for the changes to take effect.
- Access from Browser: Open your web browser and navigate to the URL you mapped your Servlet to (e.g.,
http://localhost:8080/YourWebAppName/greet).
In essence, deploying a Servlet is the process of setting up your Java web application correctly within a web server’s environment. Mastering this deployment process is an indispensable skill, ensuring your dynamic web content reaches your users effectively.