JavaScript Event Handlers: Responding to User Actions
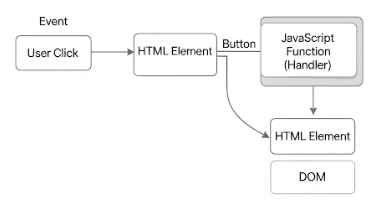
In web development, creating interactive and dynamic user experiences is paramount. This is primarily achieved through JavaScript event handlers, which are blocks of code designed to react to specific events occurring on a web page. Events can range from a user clicking a button (onclick) or submitting a form (onsubmit) to a page finishing loading or a key being pressed. Understanding how to effectively use JavaScript event handlers is crucial for building responsive and engaging web applications that truly interact with users.
What are JavaScript Event Handlers?
JavaScript event handlers are mechanisms that allow your code to detect and respond to events that happen in the browser. These events represent actions performed by the user (e.g., mouse clicks, key presses, form submissions) or changes in the browser’s state (e.g., page loaded, image loaded). By assigning a function (the “event handler” or “event listener”) to an event, you can specify what code should run when that particular event occurs on a specific HTML element. This enables the creation of dynamic content, form validations, animations, and much more.
Common Types of Event Handlers
JavaScript supports a wide array of events, each with its corresponding handler. Here are some of the most common JavaScript event handlers:
onclick: This handler fires when a user clicks on an HTML element. It’s one of the most frequently used event handlers for buttons, links, and other interactive elements.- Example:
onclick="myFunction()"
- Example:
onsubmit: This event occurs when a form is submitted. It’s often used for form validation before the data is sent to the server.- Example:
onsubmit="return validateForm()"
- Example:
onload: This handler is triggered when a page or an image has finished loading. It’s useful for executing code once all content is ready.onchange: Fires when the value of an input element (like<input>,<select>,<textarea>) changes and the element loses focus.onmouseover/onmouseout: These handlers respond to the mouse cursor moving over (onmouseover) or away from (onmouseout) an element.onkeyup/onkeydown: These handlers respond to a key being released (onkeyup) or pressed down (onkeydown).
Assigning JavaScript Event Handlers
There are primarily three ways to assign JavaScript event handlers to HTML elements:
1. HTML Event Handler Attributes
This is the simplest and most rudimentary way to assign an event handler, directly within the HTML tag. While easy to implement for simple cases, it often leads to less maintainable code, as JavaScript logic becomes intertwined with HTML structure.
<button onclick="alert('Button clicked!');">Click Me</button>

<form onsubmit="return confirm('Submit form?');">
    <input type="submit" value="Submit">
</form>
2. DOM Event Handler Properties
You can assign event handlers to elements using their DOM properties in JavaScript. This method separates JavaScript from HTML, leading to cleaner code. However, it only allows one event handler per event type per element. If you assign a second handler, it will overwrite the first.
<!DOCTYPE html>
<html>
<body>
<button id="myButton">Click for Property</button>
<script>
    document.getElementById('myButton').onclick = function() {
        alert('Button clicked via DOM property!');
    };
</script>
</body>
</html>
3. The addEventListener() Method
This is the modern and recommended approach for assigning JavaScript event handlers. The addEventListener() method offers several advantages:
- Multiple Handlers: It allows you to add multiple event handlers of the same type to a single element without overwriting previous ones.
- Separation of Concerns: It completely separates JavaScript from HTML.
- More Control: It provides more control over the event handling process, including options for event capturing and bubbling.
The addEventListener() method takes three arguments: the event type (e.g., 'click', 'submit'), the function to call when the event occurs, and an optional boolean for useCapture (defaults to false).
<!DOCTYPE html>
<html>
<body>
<button id="btnEvent">Click for Listener</button>
<script>
    let btn = document.querySelector('#btnEvent');

    // Add the first event listener
    btn.addEventListener('click', function(event) {
        alert('First listener: ' + event.type); // 'click'
    });

    // Add a second event listener for the same click event
    btn.addEventListener('click', function() {
        alert('Second listener: Button Clicked!');
    });
</script>
</body>
</html>
As demonstrated, addEventListener() allows multiple responses to a single event, making it the most flexible and robust way to manage JavaScript event handlers. Furthermore, its counterpart, removeEventListener(), can be used to detach event listeners. It requires the same arguments as addEventListener() to correctly identify and remove the specific listener.
Conclusion
JavaScript event handlers are indispensable for creating interactive web pages. By understanding and utilizing onclick, onsubmit, and other event types, along with the powerful addEventListener() method, developers can build dynamic user interfaces that respond intuitively to user actions. Mastering these handlers is a crucial step in developing engaging and highly functional web applications.