Connecting to Database in JSP: A Guide to JDBC
Creating dynamic web applications often requires interacting with databases to store and retrieve information. Connecting to a database in JSP is a fundamental skill, enabling your web pages to display personalized content, manage user data, or support e-commerce functionalities. This crucial process is primarily achieved through JDBC (Java Database Connectivity), which provides a standard API for Java applications to communicate with various relational databases. Understanding how to connect to a database in JSP is therefore essential for robust web development.
The Role of JDBC in JSP Database Connectivity
JDBC, or Java Database Connectivity, serves as the standard Java API for connecting Java applications to databases. In the context of JSP, JDBC provides the necessary classes and interfaces that allow your JSP pages (which are ultimately converted into Servlets) to perform database operations like querying, inserting, updating, and deleting data. Essentially, JDBC acts as a bridge between your Java code and the underlying database system, offering a uniform way to interact with different database vendors (e.g., MySQL, Oracle, PostgreSQL).
Steps for Connecting to a Database in JSP
Connecting to a database in JSP typically involves a standardized sequence of six steps using the JDBC API. These steps ensure proper interaction and resource management.
Step 1: Loading the JDBC Driver
First and foremost, you must load the appropriate JDBC driver for your specific database. The driver acts as the bridge, translating JDBC calls into the specific protocol understood by your database. This is usually done using Class.forName().
Java
try {
    Class.forName("com.mysql.cj.jdbc.Driver"); // Example for MySQL
} catch (ClassNotFoundException e) {
    // Handle the exception
    e.printStackTrace();
}
Step 2: Establishing the Connection
After loading the driver, the next crucial step is to establish a connection to the database. This involves providing the database URL, username, and password. The DriverManager.getConnection() method is used for this purpose.
Java
Connection con = null;
try {
    String url = "jdbc:mysql://localhost:3306/your_database_name";
    String user = "your_username";
    String password = "your_password";
    con = DriverManager.getConnection(url, user, password);
} catch (SQLException e) {
    // Handle the exception
    e.printStackTrace();
}
Step 3: Creating a Statement
Once a connection is established, you need a Statement object to execute SQL queries. This object is responsible for sending SQL commands to the database.
Java
Statement stmt = null;
try {
    if (con != null) {
        stmt = con.createStatement();
    }
} catch (SQLException e) {
    // Handle the exception
    e.printStackTrace();
}
Step 4: Executing Queries
With the Statement object, you can now execute various SQL queries. For SELECT queries (which retrieve data), you use executeQuery(), which returns a ResultSet. For INSERT, UPDATE, or DELETE operations, you use executeUpdate(), which returns the number of affected rows.
Java
ResultSet rs = null;
try {
    if (stmt != null) {
        // Example for SELECT query
        rs = stmt.executeQuery("SELECT id, name FROM users");

        // Example for INSERT/UPDATE/DELETE
        // int rowsAffected = stmt.executeUpdate("INSERT INTO users (name) VALUES ('New User')");
    }
} catch (SQLException e) {
    // Handle the exception
    e.printStackTrace();
}
Step 5: Processing the ResultSet (for SELECT)
If you executed a SELECT query, the results are contained within a ResultSet object. You typically iterate through this ResultSet to extract the data.
Java
if (rs != null) {
    while (rs.next()) {
        int id = rs.getInt("id");
        String name = rs.getString("name");
        // Process the data (e.g., display on JSP)
        out.println("<p>ID: " + id + ", Name: " + name + "</p>");
    }
}
Step 6: Closing Resources
Finally, it is absolutely critical to close all JDBC resources (ResultSet, Statement, and Connection) in the reverse order of their creation. This prevents resource leaks and ensures the database connection is released back to the connection pool or to the system. This should always be done in a finally block to guarantee execution, even if errors occur.
Java
finally {
    try {
        if (rs != null) rs.close();
        if (stmt != null) stmt.close();
        if (con != null) con.close();
    } catch (SQLException e) {
        // Log or handle closing exceptions
        e.printStackTrace();
    }
}
A Complete JSP Example for Database Connection
Here’s a comprehensive JSP example demonstrating how to fetch user data from a database and display it on a web page. This illustrates the full process of connecting to a database in JSP.
Java
<%@ page import="java.sql.*" %>
<!DOCTYPE html>
<html>
<head>
<title>User List from Database</title>
</head>
<body>
<h1>Users in Our System</h1>
<%
Connection con = null;
Statement stmt = null;
ResultSet rs = null;

try {
    // Step 1: Load the JDBC Driver
    Class.forName("com.mysql.cj.jdbc.Driver");

    // Step 2: Establish the Connection
    con = DriverManager.getConnection("jdbc:mysql://localhost:3306/your_database_name", "your_username", "your_password");

    // Step 3: Create a Statement
    stmt = con.createStatement();

    // Step 4: Execute Query
    rs = stmt.executeQuery("SELECT id, name, email FROM users");

    // Step 5: Process the ResultSet
    if (rs.next()) { // Check if there's at least one row
%>
    <table border="1">
        <tr>
            <th>ID</th>
            <th>Name</th>
            <th>Email</th>
        </tr>
    <%
        do {
    %>
        <tr>
            <td><%= rs.getInt("id") %></td>
            <td><%= rs.getString("name") %></td>
            <td><%= rs.getString("email") %></td>
        </tr>
    <%
        } while (rs.next());
    %>
    </table>
<%
    } else {
%>
    <p>No users found in the database.</p>
<%
    }

} catch (SQLException e) {
    out.println("<h3>Database Error:</h3>");
    out.println("<p>" + e.getMessage() + "</p>");
    e.printStackTrace();
} catch (ClassNotFoundException e) {
    out.println("<h3>Driver Not Found Error:</h3>");
    out.println("<p>" + e.getMessage() + "</p>");
    e.printStackTrace();
} finally {
    // Step 6: Close Resources
    try {
        if (rs != null) rs.close();
        if (stmt != null) stmt.close();
        if (con != null) con.close();
    } catch (SQLException e) {
        out.println("<h3>Error closing resources:</h3>");
        out.println("<p>" + e.getMessage() + "</p>");
        e.printStackTrace();
    }
}
%>
</body>
</html>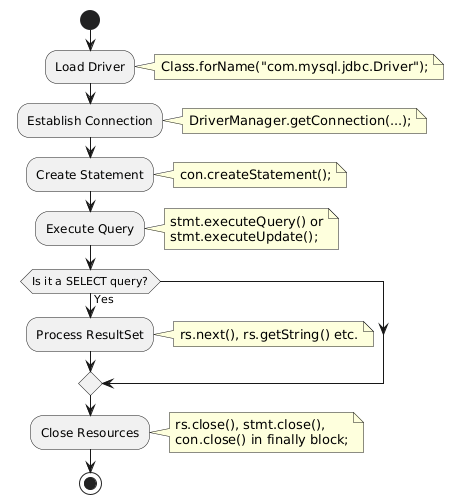
Best Practices for Database Connectivity in JSP
While embedding JDBC code directly in JSP provides quick connectivity, adhering to best practices is crucial for maintainable, secure, and scalable applications.
- Separate Database Logic from Presentation: It is highly recommended to keep database interaction logic separate from your JSP’s presentation code. Instead of putting JDBC code directly into JSP scriptlets, use JavaBeans, Servlets, or dedicated data access objects (DAOs). This aligns with the Model-View-Controller (MVC) architectural pattern, making your application easier to manage and test.
- Utilize Connection Pooling: For performance-intensive applications, using connection pooling is vital. Establishing a new database connection for every request is resource-heavy and slow. Connection pooling manages a pool of ready-to-use connections, significantly improving application performance and resource utilization. Technologies like Apache Commons DBCP or C3P0 are popular choices.
- Prevent SQL Injection with Prepared Statements: Always use
PreparedStatementinstead ofStatementwhen executing queries that involve user input.PreparedStatementpre-compiles the SQL query and allows you to set parameters, automatically handling special characters. This effectively prevents dangerous SQL injection attacks. - Robust Error Handling: Implement comprehensive
try-catch-finallyblocks. Thefinallyblock is essential for ensuring that database resources are always closed, regardless of whether an exception occurred. Provide user-friendly error messages rather than raw stack traces.
By adopting these practices, your JSP applications will achieve more reliable and secure database interactions.
For a comprehensive tutorial on JDBC basics from Oracle, which provides a solid foundation for database connectivity, visit the Oracle JDBC Basics Tutorial.