Connecting to a Database Using JDBC: Essential for Data-Driven Servlets
Hello everyone! In modern web applications, the ability to store, retrieve, and manage dynamic data is paramount. This is primarily achieved by connecting to a database using JDBC, which serves as the standard Java API for database connectivity. Mastering JDBC is therefore essential for any Servlet developer aiming to build robust, data-driven web applications that interact with relational databases.
What is JDBC?
JDBC (Java Database Connectivity) is a Java API that allows Java applications to interact with various types of databases. It provides a set of interfaces and classes that define how a Java program can connect to a database, issue SQL queries, and process the results. Essentially, JDBC acts as a bridge between your Java application (like a Servlet) and a relational database, enabling the flow of data.
The JDBC API is part of the java.sql and javax.sql packages. It abstracts away the complexities of database-specific drivers, providing a uniform way to access different database systems (e.g., MySQL, Oracle, PostgreSQL, SQL Server).
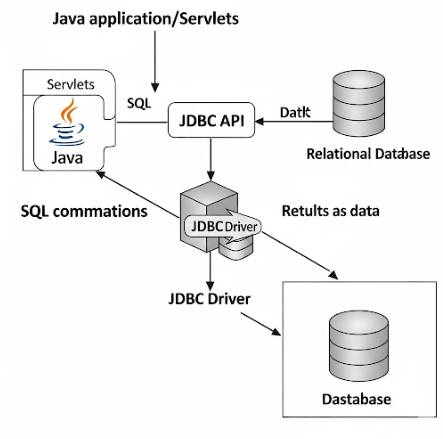
JDBC Architecture
The JDBC architecture typically involves two layers: the JDBC API layer and the JDBC driver layer. A key component is the JDBC Driver, which is a software component that enables your Java application to communicate directly with a specific database. There are four main types of JDBC drivers:
- Type 1: JDBC-ODBC Bridge Driver: Translates JDBC calls into ODBC calls. (Legacy, generally not recommended for production).
- Type 2: Native-API Driver: Converts JDBC calls into database-specific client-side API calls.
- Type 3: Network Protocol Driver (Middleware Driver): Uses a net-centric middleware that translates JDBC calls into a database-specific network protocol.
- Type 4: Thin Driver (Native-Protocol Pure Java Driver): Converts JDBC calls directly into the network protocol used by the database. These are entirely written in Java and are highly preferred due to their platform independence and performance.
For connecting to a database using JDBC, the Type 4 driver is commonly used.
Steps for Connecting to a Database Using JDBC
To connect to a database and perform operations from a Servlet (or any Java application) using JDBC, you generally follow these five fundamental steps:
Register the JDBC Driver
Before you can connect, the database driver must be loaded into memory. This is typically done using
Class.forName(), which dynamically loads the driver class.- Example:
Class.forName("com.mysql.cj.jdbc.Driver");(for MySQL)
- Example:
Establish a Connection
Once the driver is registered, you can establish a connection to the database using the
DriverManager.getConnection()method. This method requires the database URL, username, and password.- Example:
Connection con = DriverManager.getConnection("jdbc:mysql://localhost:3306/demoprj", "root", "password");
- Example:
Create a Statement
A
Statementobject is used to send SQL queries to the database. You can create different types of statements:Statement: For executing static SQL queries.PreparedStatement: For pre-compiled SQL queries with parameters, which improves performance and prevents SQL injection.CallableStatement: For executing stored procedures.- Example:
Statement stmt = con.createStatement();
Execute the Query
After creating a statement, you execute the appropriate SQL query.
- For
SELECTqueries (data retrieval), useexecuteQuery(), which returns aResultSet. - For
INSERT,UPDATE,DELETEqueries (data modification), useexecuteUpdate(), which returns the number of rows affected. - Example (SELECT):
ResultSet rs = stmt.executeQuery("SELECT * FROM users"); - Example (INSERT):
int rowsAffected = stmt.executeUpdate("INSERT INTO users VALUES ('John', 'Doe')");
- For
Process the Results and Close Resources
If you executed a
SELECTquery, you process the data returned in theResultSet. Finally, it is crucial to close all opened JDBC resources (ResultSet,Statement,Connection) in reverse order of their creation to release database resources. This is typically done in afinallyblock to ensure they are closed even if exceptions occur.- Example (Processing ResultSet):Java
while (rs.next()) {
    System.out.println("User: " + rs.getString("name"));
}
// Closing resources
rs.close();
stmt.close();
con.close();
- Example (Processing ResultSet):
Practical Example: Servlet Connecting to a Database Using JDBC
Here’s a simplified Servlet example that demonstrates connecting to a database using JDBC to retrieve and display data:
import java.io.IOException;
import java.io.PrintWriter;
import java.sql.Connection;
import java.sql.DriverManager;
import java.sql.ResultSet;
import java.sql.Statement;
import javax.servlet.ServletException;
import javax.servlet.http.HttpServlet;
import javax.servlet.http.HttpServletRequest;
import javax.servlet.http.HttpServletResponse;

public class UserDataServlet extends HttpServlet {
    protected void doGet(HttpServletRequest request, HttpServletResponse response)
            throws ServletException, IOException {
        response.setContentType("text/html");
        PrintWriter out = response.getWriter();
        Connection con = null;
        Statement stmt = null;
        ResultSet rs = null;

        try {
            // Step 1: Register JDBC driver
            Class.forName("com.mysql.cj.jdbc.Driver");

            // Step 2: Open a connection
            con = DriverManager.getConnection("jdbc:mysql://localhost:3306/mydatabase", "root", "my_password");

            // Step 3: Create a statement
            stmt = con.createStatement();

            // Step 4: Execute query
            rs = stmt.executeQuery("SELECT id, name FROM users");

            out.println("<html><body><h2>User List:</h2><ul>");
            // Step 5: Process results
            while (rs.next()) {
                out.println("<li>ID: " + rs.getInt("id") + ", Name: " + rs.getString("name") + "</li>");
            }
            out.println("</ul></body></html>");

        } catch (Exception e) {
            out.println("An error occurred: " + e.getMessage());
            e.printStackTrace();
        } finally {
            // Step 5 (cont.): Close resources
            try {
                if (rs != null) rs.close();
                if (stmt != null) stmt.close();
                if (con != null) con.close();
            } catch (Exception e) {
                e.printStackTrace();
            }
        }
        out.close();
    }
}
This example outlines the fundamental process of connecting to a database using JDBC from a Servlet, making it a powerful tool for dynamic web content generation based on database information.
For comprehensive official documentation on JDBC, refer to the Oracle JDBC documentation.