Mastering HTML’s Power Tags: Lists, Tables, Images, Forms, and Frames for B.Tech Trailblazers!
Welcome back, future tech architects! 🚀 After laying the solid foundation with HTML’s basic structure and text formatting, it’s time to equip yourselves with the dynamic tools that bring life and interactivity to your webpages. Get ready to conquer lists, organize data with tables, embed stunning visuals, build engaging forms, and even craft multi-pane layouts with frames! Let’s elevate your web development game!
Essential HTML Common Tags: Your Web Dev Toolkit (Continued)!
2. Lists: Organizing Your Digital Information Like a Pro!
Just like a well-structured lecture needs bullet points and numbered sequences, your webpages benefit immensely from organized lists. HTML offers three distinct types of lists, each serving a unique purpose.
a. Ordered List (<ol>): The Sequential Powerhouse!
The <ol> tag is your go-to when the order of items matters. Think step-by-step instructions, rankings, or chronological sequences. By default, items in an ordered list are numbered using Arabic numerals.
Syntax:
HTML<ol> <li>List Item 1</li> <li>List Item 2</li> <li>List Item 3</li> </ol>Attributes:
type: Specifies the numbering style."1"(Default): Arabic numerals (1, 2, 3…)"A": Uppercase letters (A, B, C…)"a": Lowercase letters (a, b, c…)"I": Uppercase Roman numerals (I, II, III…)"i": Lowercase Roman numerals (i, ii, iii…)
start: Specifies the start value of the list.
List Item Tag (
<li>): Each item within an ordered list is enclosed by the<li>...</li>tag.
Example (Ordered List):
<html>
<body>
    <h2>Ordered List of Subjects</h2>
    <ol>
        <li>Web Technologies</li>
        <li>Compiler Design</li>
    </ol>

    <h2>Ordered List (Type A)</h2>
    <ol type="A">
        <li>Object Oriented Analysis and Design</li>
        <li>Network Security</li>
    </ol>
</body>
</html>
What to Expect: The webpage will display two ordered lists. The first list will be numbered “1.” and “2.” for “Web Technologies” and “Compiler Design” respectively. The second list will use uppercase letters, displaying “A. Object Oriented Analysis and Design” and “B. Network Security”.
Output (Simulated Browser View):
Ordered List of Subjects
1. Web Technologies
2. Compiler Design

Ordered List (Type A)
A. Object Oriented Analysis and Design
B. Network Security
b. Unordered List (<ul>): The Bullet-Point Brilliance!
When the sequence of items is not important, and you just want to present a collection of related items, the <ul> tag comes to your rescue. Items are typically marked with bullets.
- Syntax:HTML
<ul> <li>List Item A</li> <li>List Item B</li> <li>List Item C</li> </ul> - Attributes:
type: Specifies the bullet style."disc"(Default): A filled circle."circle": An unfilled circle."square": A filled square.
- List Item Tag (
<li>): Similar to ordered lists,<li>...</li>encloses each item.
Example (Unordered List):
<html>
<body>
    <h2>Unordered List of Subjects</h2>
    <ul>
        <li>Web Technologies</li>
        <li>Compiler Design</li>
    </ul>

    <h2>Unordered List (Type Square)</h2>
    <ul type="square">
        <li>Object Oriented Analysis and Design</li>
        <li>Network Security</li>
    </ul>
</body>
</html>
What to Expect: The webpage will display two unordered lists. The first list will use default bullet points (discs) for “Web Technologies” and “Compiler Design”. The second list will use square bullet points for “Object Oriented Analysis and Design” and “Network Security”.
Output (Simulated Browser View):
Unordered List of Subjects
• Web Technologies
• Compiler Design

Unordered List (Type Square)
▪ Object Oriented Analysis and Design
▪ Network Security
c. Definition List (<dl>): Defining Terms with Finesse!
For glossaries, FAQs, or any scenario where you need to present terms and their corresponding definitions, the <dl> (Definition List) tag is your perfect companion.
- Syntax:HTML
<dl> <dt>Term 1</dt> <dd>Definition of Term 1</dd> <dt>Term 2</dt> <dd>Definition of Term 2</dd> </dl> - Definition Term Tag (
<dt>): Specifies the term being defined. - Definition Description Tag (
<dd>): Provides the definition for the preceding term, often indented.
Example (Definition List):
<html>
<body>
    <h2>Definition List</h2>
    <dl>
        <dt>WT</dt>
        <dd>WT Stands for Web Technology</dd>
        <dt>CD</dt>
        <dd>CD Stands for Compiler Design</dd>
    </dl>
</body>
</html>
What to Expect: The webpage will display a definition list with “WT” and “CD” as terms. Each term will be followed by its definition, typically indented.
Output (Simulated Browser View):
Definition List
WT
    WT Stands for Web Technology
CD
    CD Stands for Compiler Design
3. Tables: Structuring Data Like a Database Dynamo!
Tables are indispensable for presenting tabular data – think student marks, product inventories, or class schedules. HTML tables allow you to arrange information in a grid of rows and columns, making it incredibly readable.
Main Tags for Tables:
<table>...</table>: This is the container for the entire table.<caption>...</caption>: Used to insert a caption or title for the table, usually displayed above the table.<tr>...</tr>: Stands for “table row.” Defines a single row in the table.<th>...</th>: Stands for “table heading.” Defines a header cell (usually bold and centered by default).<td>...</td>: Stands for “table data.” Defines a standard data cell.
Common
<table>Attributes:border="n": Specifies the thickness of the table border in pixels. A value of0means no border.height="n": Sets the height of the table in pixels or as a percentage.width="n": Sets the width of the table in pixels or as a percentage.cellpadding="n": Controls the space between the content of a cell and its border (inner padding).cellspacing="n": Controls the space between individual cells (outer spacing).align="{left/right/center}": Aligns the table on the page.
Example (Basic Table):
<html>
<body>
    <table border="1" cellpadding="5" cellspacing="2" width="50%">
        <caption>Student Marks - B.Tech CSE</caption>
        <tr>
            <th>Roll No</th>
            <th>Name</th>
            <th>Subject 1 (WT)</th>
            <th>Subject 2 (CD)</th>
            <th>Total Marks</th>
        </tr>
        <tr>
            <td>101</td>
            <td>Anand</td>
            <td>85</td>
            <td>90</td>
            <td>175</td>
        </tr>
        <tr>
            <td>102</td>
            <td>Bhavya</td>
            <td>92</td>
            <td>88</td>
            <td>180</td>
        </tr>
    </table>
</body>
</html>
What to Expect: A table will be displayed with a border, cell padding, and spacing. It will have a caption “Student Marks – B.Tech CSE”. The first row will be table headers: “Roll No”, “Name”, “Subject 1 (WT)”, “Subject 2 (CD)”, and “Total Marks”. Following rows will contain student data.
Output (Simulated Browser View):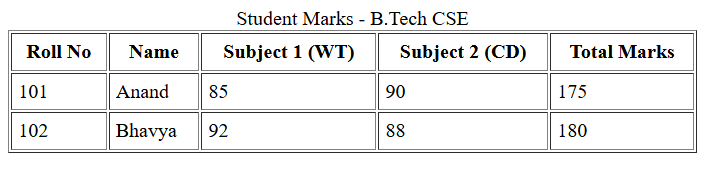
4. Images: Adding Visual Appeal to Your Web Masterpiece!
A picture speaks a thousand words, and in web development, images are crucial for engagement, branding, and conveying information visually. The <img> tag is your gateway to embedding graphics.
Syntax:
HTML<img src="filename/path" alt="Alternative Text" />Key Attributes:
src: (Mandatory!) Specifies the source URL or path to the image file. This is the most vital attribute.alt: (Highly Recommended for SEO & Accessibility!) Provides alternative text for the image. This text is displayed if the image cannot be loaded (e.g., due to a broken link or slow connection), or if a screen reader is used by visually impaired users. It’s also vital for search engine optimization.height="n": Sets the height of the image in pixels.width="n": Sets the width of the image in pixels.border="n": Adds a border around the image in pixels.align="{left/right/top/bottom}": Aligns the image relative to surrounding text.
Images as Hyperlinks: You can make an image clickable by nesting the
<img>tag inside an anchor<a>tag.
Example (Embedding Image & Image as Link):
Let’s assume you have an image file named btech_logo.png in the same directory as your HTML file.
<html>
<body>
<h2>Our University Logo</h2>
<img src="https://cmrtpoint.com/wp-content/uploads/2024/09/logo.png" alt="B.Tech University Logo" width="200" height="150" border="2" />

<h2>Visit Our Website!</h2>
<a href="https://cmrtpoint.com/">
<img src="https://cmrtpoint.com/wp-content/uploads/2024/09/logo.png" alt="Website Link" width="100" height="100" />
</a>
<p>Click the icon above to go to our official university website.</p>
</body>
</html>
What to Expect: The webpage will display a heading “Our University Logo” followed by the “btech_logo.png” image, 200 pixels wide and 150 pixels high, with a 2-pixel border. Below that, a heading “Visit Our Website!” will appear, and then the “website_icon.png” image (50×50 pixels) will be displayed. This icon will be clickable, leading to https://www.youruniversity.edu.
Output (Simulated Browser View):
5. Forms: Interacting with Your Users – The Data Gateway!
Forms are the backbone of user interaction on the web. From login pages to registration forms, feedback surveys to e-commerce checkout, HTML forms allow users to input data and send it to a server for processing. This is where your front-end meets the back-end!
The
<form>Tag:- This is the container for all your form elements.
- Attributes:
action="URL": (Crucial!) Specifies the URL of the server-side script or application that will process the form data when it’s submitted.method="{get/post}": Specifies how the form data should be sent to the server.GETMethod:- Appends form data to the URL as query parameters.
- Data is visible in the browser’s address bar (less secure for sensitive info).
- Limited character capacity.
- Suitable for non-sensitive data like search queries.
POSTMethod:- Sends form data in the body of the HTTP request.
- Data is invisible in the URL (more secure for sensitive info).
- No character limitations.
- Suitable for sensitive data like passwords, large text blocks.
Common Form Input Elements (
<input>tag withtypeattribute):- Text Fields (
<input type="text">): A single-line input box for free-form text.- Attributes:
name(for server-side processing),size(width),maxlength,value(initial text).
- Attributes:
- Password Fields (
<input type="password">): Similar to text, but characters are masked (e.g., with asterisks or dots). - Buttons:
- Submit Button (
<input type="submit">): Submits the form data to theactionURL. - Reset Button (
<input type="reset">): Clears all entered data in the form. - Generic Button (
<input type="button">): A client-side button, typically used with JavaScript for custom actions.
- Submit Button (
- Radio Buttons (
<input type="radio">): Allows the user to select only one option from a group.- Key: All radio buttons in a group must have the same
nameattribute but differentvalueattributes.
- Key: All radio buttons in a group must have the same
- Checkboxes (
<input type="checkbox">): Allows the user to select zero or more options from a group.- Key: Each checkbox has its own
nameandvalue.
- Key: Each checkbox has its own
- Labels (
<label>): Associates a text label with a form control, improving accessibility. Use theforattribute to link to theidof the input.
- Text Fields (
Other Form Elements:
- Text Area (
<textarea>): For multi-line text input (e.g., comments, messages).- Attributes:
name,rows,cols.
- Attributes:
- Dropdown/Combo Box (
<select>with<option>): Allows selecting one item from a list.size="1"for a dropdown.
- List Box (
<select size="n">with<option>): Allows selecting one or multiple items from a visible list.size > 1makes it a list box. Addmultipleattribute to allow multiple selections.
- Text Area (
Example (User Registration Form):
<html>
<head>
    <title>Registration Form</title>
</head>
<body>
    <h2>Student Registration</h2>
    <form action="/submit_registration" method="post">
        <label for="fname">First Name:</label>
        <input type="text" id="fname" name="firstname" size="30" maxlength="50"><br><br>

        <label for="password">Password:</label>
        <input type="password" id="password" name="pwd" size="20"><br><br>

        <label>Gender:</label>
        <input type="radio" id="male" name="gender" value="male">
        <label for="male">Male</label>
        <input type="radio" id="female" name="gender" value="female">
        <label for="female">Female</label><br><br>

        <label>Hobbies:</label>
        <input type="checkbox" id="coding" name="hobby" value="coding">
        <label for="coding">Coding</label>
        <input type="checkbox" id="sports" name="hobby" value="sports">
        <label for="sports">Sports</label>
        <input type="checkbox" id="reading" name="hobby" value="reading">
        <label for="reading">Reading</label><br><br>

        <label for="branch">Select Branch:</label>
        <select id="branch" name="branch_selection">
            <option value="cse">CSE</option>
            <option value="ece">ECE</option>
            <option value="eee">EEE</option>
            <option value="mech">Mechanical</option>
        </select><br><br>

        <label for="comments">Comments:</label><br>
        <textarea id="comments" name="user_comments" rows="5" cols="40"></textarea><br><br>

        <input type="submit" value="Register">
        <input type="reset" value="Clear Form">
    </form>
</body>
</html>
What to Expect: A registration form will appear with the title “Student Registration”. It will include input fields for “First Name” (text) and “Password” (masked). There will be radio buttons for “Gender” (Male/Female, only one selectable). Checkboxes for “Hobbies” (Coding, Sports, Reading, multiple selectable). A dropdown for “Select Branch” (CSE, ECE, EEE, Mechanical). A multi-line “Comments” text area. Finally, “Register” (submit) and “Clear Form” (reset) buttons.
Output (Simulated Browser View):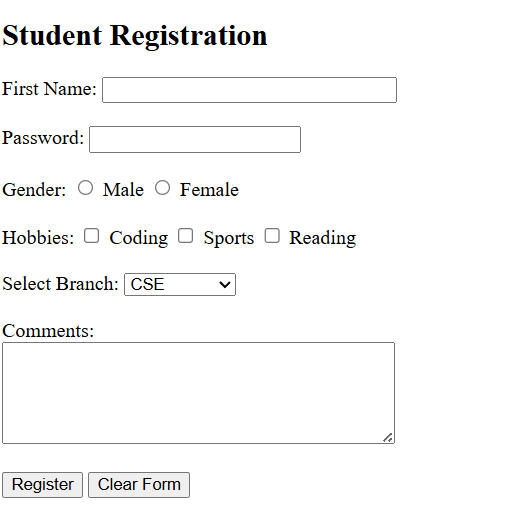
6. Frames: Dividing Your Browser Window (The Classic Approach)!
While modern web design largely relies on CSS for layout, understanding HTML frames is crucial for comprehending older web structures and historical context. Frames allow you to divide the browser window into multiple independent, rectangular regions, each displaying a separate HTML document.
The
<frameset>Tag:- This tag is used to define the layout of the frames within the browser window.
- Crucially, a
<frameset>tag replaces the<body>tag in an HTML document. An HTML document can have either a<body>or a<frameset>tag, but never both. - Attributes:
rows="value1, value2, ...": Divides the window into horizontal frames (rows). Values can be pixels, percentages, or*(to take remaining space).cols="value1, value2, ...": Divides the window into vertical frames (columns). Values can be pixels, percentages, or*.
The
<frame>Tag:- Used within a
<frameset>to specify the HTML document to be displayed in each frame. - Attributes:
src="URL": Specifies the URL of the HTML document to load into the frame.name="framename": Assigns a unique name to the frame, useful for targeting links (targetattribute in<a>).noresize: Prevents the user from resizing the frame.scrolling="{yes/no/auto}": Controls whether scrollbars appear.
- Used within a
The
<noframes>Tag:- Provides alternative content for browsers that do not support frames.
Example (Simple Two-Column Frame Layout):
Let’s assume you have two HTML files: left_nav.html and main_content.html.
index.html (The Frameset Document):
<html>
<head>
    <title>My Framed Page</title>
</head>
<frameset cols="25%, 75%">
    <frame src="left_nav.html" name="leftFrame" noresize>
    <frame src="main_content.html" name="mainFrame">
    <noframes>
        <body>
            <p>Your browser does not support frames. Please visit our <a href="main_content.html">main page</a>.</p>
        </body>
    </noframes>
</frameset>
</html>
left_nav.html (Content for Left Frame):
<html>
<body bgcolor="lightgray">
    <h3>Navigation</h3>
    <ul>
        <li><a href="page1.html" target="mainFrame">Page 1</a></li>
        <li><a href="page2.html" target="mainFrame">Page 2</a></li>
    </ul>
</body>
</html>
main_content.html (Content for Right Frame):
<html>
<body>
    <h1>Welcome to the Main Section!</h1>
    <p>This is the content that will change when you click navigation links.</p>
</body>
</html>
What to Expect: The browser window will be divided vertically into two columns. The left column (25% width) will display left_nav.html (a light gray background with “Navigation” and a list of links). The right column (75% width) will display main_content.html (a heading and a paragraph). Clicking links in the left frame will load new content into the right frame (mainFrame).
Output (Simulated Browser View):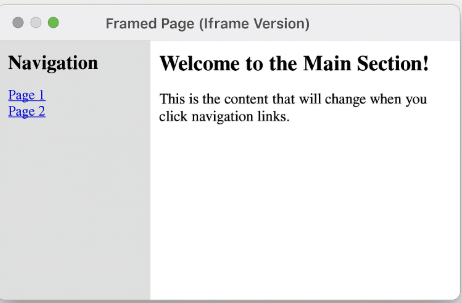
You’ve now armed yourselves with the most powerful and commonly used HTML tags! From organizing information to building interactive forms, these are the fundamental building blocks of almost every webpage you encounter. Keep experimenting, keep coding, and soon you’ll be crafting web experiences like seasoned professionals! Next, we’ll explore the magic of Cascading Style Sheets (CSS) to make your web creations visually stunning and responsive! Stay tuned!